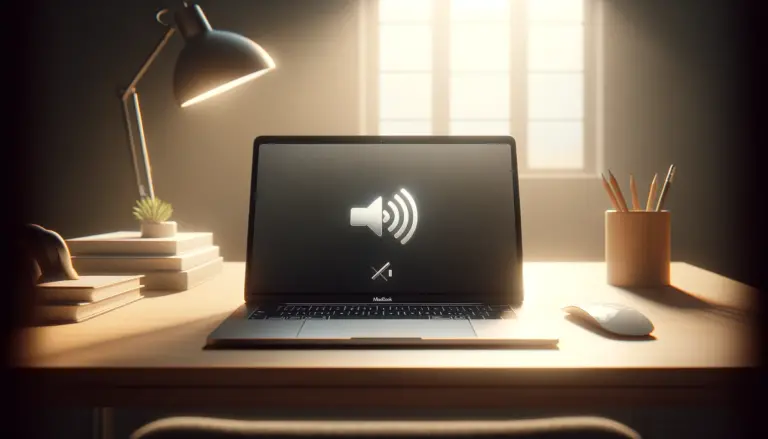
Discover the simple steps to achieve peace and quiet by turning off the ringer on your MacBook. Whether you’re in a meeting, library, or just prefer a silent workspace, this guide will walk you through the process. Learn not only how to mute your MacBook’s ringer but also how to manage audio settings for notifications and calls. Plus, explore our FAQ section for quick answers to common questions.
Don’t have time to read, here is a quick summary:
Comparison of Methods for Muting Your MacBook
| Method | Accessibility | Use Case |
|---|---|---|
| System Preferences | Moderate | Detailed settings adjustment |
| Menu Bar Volume Control | Easy | Quick access for volume adjustment |
| Keyboard Shortcut (F10) | Easy | Immediate muting |
| Scheduled Do Not Disturb | Moderate | Automatic muting at specified times |
Table of Contents
Understanding Your MacBook’s Sound Settings
Navigating the sound settings on your MacBook is the first step to mastering its audio capabilities. This section provides an overview of sound preferences and instructions on how to access these settings, ensuring you can efficiently turn the ringer off on your MacBook.
Overview of Sound Preferences
Your MacBook’s sound preferences are designed to give you full control over the audio output and input devices, system sounds, and alert tones. These preferences allow you to:
- Select your output device: Choose where your sound plays from, be it the built-in speakers, headphones, or external speakers.
- Adjust the alert volume: Control how loud your notifications and alerts sound.
- Choose an alert sound: Customize the sound that plays when you receive a notification.
Understanding these options is crucial for tailoring your MacBook’s audio to your environment and preferences.
Accessing Sound Settings
To access your MacBook’s sound settings, follow these steps:
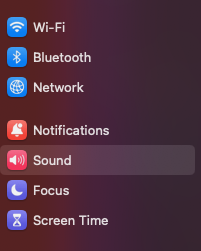
- Click on the Apple menu in the top-left corner of your screen.
- Select “System Preferences” from the dropdown menu.
- Click on “Sound” to open the sound preferences panel.
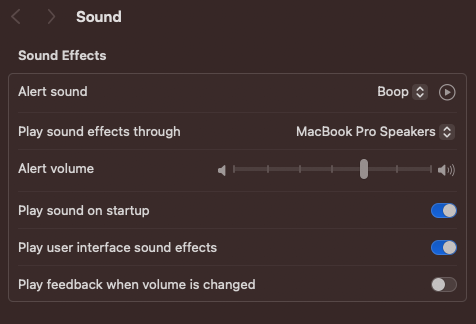
Here, you’ll find tabs for “Sound Effects,” “Output,” and “Input.” The “Sound Effects” tab is where you can manage your alert volume and select a sound for notifications. The “Output” and “Input” tabs allow you to manage your external and internal audio devices.
By familiarizing yourself with these settings, you can ensure that your MacBook’s audio is perfectly adjusted for any situation, including knowing how to efficiently mute your MacBook’s ringer for those times when silence is golden.
How to Mute Your MacBook’s Ringer
Achieving silence on your MacBook can be essential, especially in environments where noise is a distraction. This section provides a detailed guide on how to mute your MacBook’s ringer, including both manual adjustments and keyboard shortcuts for quick muting.
Step-by-Step Guide
Muting the ringer on your MacBook can be accomplished in a few simple steps:
Method 1: Through System Preferences:
- Open “System Settings” from the Apple menu.
- Click on “Sound” to access the sound settings.
- In the “Sound Effects” tab, drag the “Alert volume” slider all the way to the left to mute the ringer.
Method 2: Via the Menu Bar:
- If you have the volume icon enabled in the menu bar, click on it.
- A slider will appear, allowing you to adjust the volume. Drag it all the way to the left to mute the system sounds.
Method 3: Keyboard Shortcuts for Quick Muting
For those who prefer keyboard shortcuts for efficiency, muting your MacBook’s ringer can be done swiftly:
- Press the Mute button (F10) on your keyboard to mute all system sounds immediately.
- Alternatively, holding down the Option key while pressing the Mute button will open the Sound preferences directly, where you can adjust the settings as needed.
These methods provide quick and easy ways to ensure your MacBook remains silent when necessary, allowing for uninterrupted focus or simply a noise-free environment.
Managing Notification Sounds
Customizing how and when your MacBook emits notification sounds is key to creating a personalized and less intrusive computing experience. This section covers customizing notification settings and disabling sound for specific apps.
Customizing Notification Settings
To tailor notification sounds to your liking:
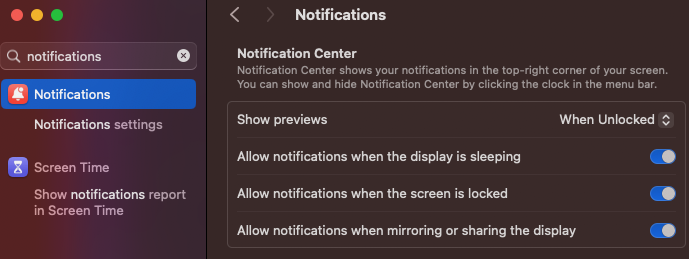
- Open “System Settings” and select “Notifications.”
- Choose an app from the list on the left to customize its notification settings.
- Here, you can adjust the notification alert style and toggle the “Play sound for notifications” option to control whether an app plays sounds.
Disabling Sound for Specific Apps
If you prefer to disable notification sounds for specific applications:
- Follow the steps above to navigate to the app’s notification settings.
- Simply uncheck the “Play sound for notifications” option for each app you wish to silence.
This customization allows you to minimize distractions by silencing non-essential notifications while still receiving alerts from critical applications. By managing your notification sounds, you maintain control over your auditory environment, ensuring that it suits your needs and preferences.
Adjusting Call Ringtone Settings
Managing call ringtone settings on your MacBook, especially for FaceTime and other VoIP services, is crucial for ensuring that incoming calls do not disrupt your workflow or peace. This section provides insights into customizing these settings for optimal convenience.
FaceTime and Other VoIP Services
For FaceTime and applications like Skype or Zoom, adjusting the ringtone and alert volumes can be done within each app’s preferences:
- FaceTime: Open FaceTime, go to “FaceTime” in the menu bar, select “Preferences,” and then navigate to the “Settings” tab. Here, you can adjust the ringtone and its volume.
- Other VoIP Services: Most VoIP apps have their own settings or preferences section where you can customize notifications and ringtones. Look for a settings icon or menu within the app.
Tips for Managing Ringtones and Alerts
- Prioritize Calls: In your VoIP app settings, look for options to prioritize calls from certain contacts to ensure you never miss important calls.
- Silent Mode: Consider setting specific times when the ringer is automatically muted, using scheduling features within the apps or your MacBook’s system settings.
Advanced Tips for Sound Management
For those looking to take their sound management to the next level, utilizing Do Not Disturb mode and exploring third-party apps can offer enhanced control over your MacBook’s audio environment.
Using Do Not Disturb Mode

Do Not Disturb mode is a powerful feature for minimizing distractions:
- Activate Do Not Disturb by clicking on the Control Center in the menu bar, then selecting “Focus” then “Do Not Disturb.”
- Scheduled Do Not Disturb: Set specific times for Do Not Disturb to activate automatically, ideal for uninterrupted work hours or rest.
Third-Party Apps for Enhanced Control
Several third-party apps offer advanced sound management features:
- Sound Control Apps: Apps like Boom 3D or SoundSource allow you to fine-tune the audio output for different applications, including equalizer settings and volume adjustments for individual apps.
- Focus Apps: Applications designed to enhance focus, such as Focus@Will, provide background noise or music that can improve concentration while allowing control over notifications.
By leveraging these advanced tips, you can create a tailored auditory environment on your MacBook, ensuring that you remain productive and undisturbed regardless of your surroundings.
FAQs
How do I quickly mute my MacBook if I can’t find the setting?
Quickly muting your MacBook can be done using the keyboard shortcut. Press the Mute button (F10) to silence the system sounds immediately. This is a convenient option when you need to mute your MacBook swiftly.
Can I set my MacBook to automatically mute at certain times?
Yes, you can set your MacBook to automatically mute at specific times by utilizing the Do Not Disturb feature. Go to “System Preferences,” select “Notifications & Focus,” and then schedule Do Not Disturb to activate during the times you prefer silence.
What should I do if my MacBook’s ringer won’t turn off?
If your MacBook’s ringer won’t turn off, check if any applications are overriding your sound settings. Additionally, restarting your MacBook can resolve issues where settings don’t seem to apply correctly.
Is there a way to mute the ringer for just specific applications?
Yes, you can mute the ringer for specific applications by adjusting the notification settings for each app. Go to “System Preferences,” select “Notifications & Focus,” choose the app, and uncheck “Play sound for notifications.”