
In an era where digital content creation is at its peak, the ability to capture or record your screen on a Mac becomes essential. Whether it’s for crafting detailed tutorials, engaging presentations, or simply reporting a problem, the right screen recording tools can make a significant difference.
This article dives into the various methods available for screen recording on Mac, from free built-in features within macOS to third-party applications. We aim to provide you with comprehensive insights and straightforward instructions on how to effectively utilize these tools. Rest assured, finding the perfect solution for your screen capture for Mac needs will be a breeze.

Table of Contents
Understanding Screen Recording on MacOS
The Basics of Screen Recording
Screen recording is a digital recording of computer screen output, often accompanied by audio narration. It’s a versatile tool used in a wide range of scenarios including:
- Creating educational tutorials and e-learning courses
- Demonstrating software functionalities
- Reporting bugs or issues to technical support
- Recording gameplay for entertainment or review
The essence of screen recording lies in its ability to visually communicate complex processes or instructions, making it an invaluable resource for educators, professionals, and content creators alike.
Built-in Features for Screen Recording in MacOS
MacOS offers native solutions for screen recording that cater to basic needs without the necessity for additional software. The most notable are:
- QuickTime Player: Beyond its capabilities as a multimedia framework, QuickTime Player allows for both screen recording and editing. It provides options for recording the entire screen or just a selected portion, making it a flexible choice for various projects.
- Screenshot Toolbar: Accessible through a simple keyboard shortcut (
Cmd + Shift + 5), the Screenshot Toolbar is a concise utility for capturing both still images and videos of your screen. It includes options for recording the entire screen, a selected window, or a custom portion, along with basic controls for recording management.
Setting Up Your Mac for Optimal Recording
To ensure your screen recordings are of the highest quality, consider the following tips before you begin:
- Screen Preparation: Clean up your desktop by closing unnecessary applications and opening just the windows you intend to capture. This not only reduces distractions but also ensures your audience focuses on the content that matters.
- Audio Quality: If your recording includes narration, use an external microphone for clearer audio. Ensure your recording environment is as quiet as possible to minimize background noise.
- Performance Settings: Adjust your Mac’s settings for optimal performance during recording. This may include increasing screen resolution, adjusting brightness, or closing resource-intensive applications.
By following these preparatory steps, you can significantly enhance the quality and clarity of your screen recordings, ensuring your content is both engaging and professional.
How to Use QuickTime Player for Screen Recording
Step-by-Step Guide:
QuickTime Player, a versatile tool within MacOS, not only plays videos but also offers a seamless screen recording feature. Here’s how to utilize it:
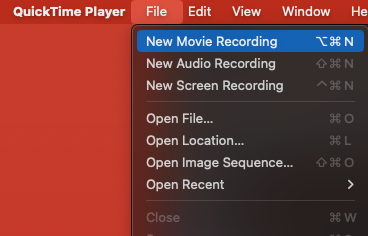
- Launching QuickTime for Screen Recording: Open QuickTime Player from your Applications folder. Navigate to “File” in the menu bar and select “New Screen Recording” to open the screen recording interface.
- Choosing the Recording Area: You have the option to record your entire screen or just a portion of it. After initiating a new screen recording, click anywhere on the screen to record the full screen, or drag to select a specific area for recording.
- Audio Recording Options: To include audio in your screen recording, click on the options button before starting the recording and choose the microphone source. If you aim for higher audio quality, selecting an external microphone from this menu is advisable.
- Saving and Editing Your Recording: Once you’ve finished recording, QuickTime Player allows you to save the file to your desired location. Furthermore, it provides basic editing features, enabling you to trim the start and end of your recording for a polished final product.
How to Use the Screenshot Toolbar for Flexible Screen Captures
Step-by-Step Guide:
The Screenshot Toolbar in MacOS provides a quick and efficient way to capture both still images and video recordings of your screen.
- Accessing the Screenshot Toolbar: Press
Cmd + Shift + 5to bring up the toolbar. This shortcut unveils options for capturing still screenshots and video recordings. - Options for Screen Capture: For still images, you can capture the entire screen, a single window, or a custom-selected portion of the screen. Choose the appropriate icon from the toolbar based on your needs.
- Recording Entire Screen or a Portion: When it comes to video, you can either record the entire screen by selecting “Record Entire Screen” or just a portion by choosing “Record Selected Portion.” After selecting, click “Record” to start.
- Quick Editing and Sharing of Your Captures: After capturing, a thumbnail appears briefly at the corner of your screen. Clicking on it before it disappears allows you to quickly edit your capture. MacOS also offers convenient sharing options directly from this editing interface, making it easy to distribute your captures via email, messages, or social media platforms.
Both QuickTime Player and the Screenshot Toolbar offer MacOS users powerful options for screen recording and capture, accommodating a wide range of needs from basic to more specific screen recording requirements.
Tips and Tricks for Professional-Quality Screen Recordings
To elevate the quality of your screen recordings, consider these tips:
- Enhancing Audio Quality: Use a high-quality external microphone and record in a quiet environment.
- Optimizing Video Settings: Adjust the resolution and frame rate for clarity, keeping an eye on file size.
- Keyboard Shortcuts: Familiarize yourself with shortcuts to start, pause, and stop recordings efficiently.
FAQs
How can I record the screen on my Mac for free?
You can use QuickTime Player or the Screenshot Toolbar built into MacOS for simple recordings. For more advanced features, free third-party apps like OBS Studio and Monosnap are excellent options.
What is the best free screen recorder for Mac OS X?
The “best” tool varies based on your specific needs. OBS Studio is great for live streaming and advanced recording, while Monosnap is user-friendly for quick captures and edits.
Can I record audio from my Mac while screen recording?
Yes, both MacOS’s native tools and most third-party apps allow you to record audio. Ensure you select the correct audio input source before starting your recording.
How do I edit a screen recording on my Mac?
QuickTime Player offers basic editing features like trimming. For more advanced editing, consider using a third-party application or professional video editing software.
Wow, I’m suprised what I didn’t use this basic feature never before.
Thanks~!!
When I record my Minecraft vidoes I get like 5 frames per second, and in game I have 40 fps, how do I fix this? I have Snapz pro x too but if I’m done recording it needs to convert a few ours until I can use it so how can I improve my frameratePlease help meCheers,Opamoeder
While sceencasting is quick and easy with QuickTime, it doesn’t offer any advanced features such as highlight effects and multiple recording formats which more advanced solutions like Acethinker Screen Grabber do.