Code coverage measures how much of your code is tested by automated tests. It helps you understand how well your tests cover the application. SonarQube, a popular open-source tool, makes it easy to track code coverage and maintain high-quality code. For more details, refer to the official SonarQube documentation. This guide explains how to set up a code coverage build gate in SonarQube for Java projects.
How to Create a Code Coverage Quality Gate in SonarQube
Step 1: Install SonarQube
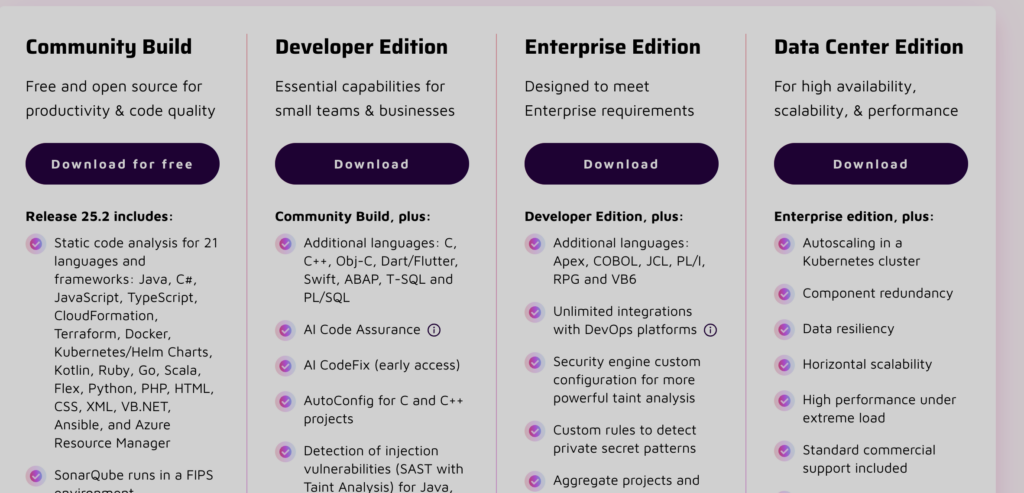
First, download the latest version of SonarQube from its official website. Follow the installation instructions to set it up on your system. SonarQube runs as a server and provides a dashboard to monitor your project’s code quality. Here is a screenshot of the different Editions available as of February 2025:

Step 2: Install SonarScanner
SonarScanner is a command-line tool that analyzes your code and sends reports to SonarQube. Download the latest version from the official website and install it by following the setup guide.
Step 3: Configure SonarScanner
After installing SonarScanner, create a configuration file in your project’s root directory. Name the file sonar-project.properties and add the following details:
sonar.projectKey=your-project-key
sonar.projectName=your-project-name
sonar.projectVersion=your-project-version

sonar.sources=your-source-folder
sonar.java.binaries=your-binary-folder
Replace your-project-key, your-project-name, your-project-version, your-source-folder, and your-binary-folder with the actual values for your project. This file tells SonarQube where to find your source code and compiled Java files.
Step 4: Configure JaCoCo
JaCoCo is a Java code coverage tool that SonarQube uses to measure test coverage. It works by instrumenting Java bytecode and generating coverage reports based on which lines, branches, and methods are executed during testing. A sample coverage report might look like this:
CLASS  COVERAGE
----------------
MyClass.java  85%
Utils.java    92%
Service.java  78%
This report helps identify untested parts of the code, ensuring better test coverage and reliability. To enable it, add the JaCoCo Maven plugin to your pom.xml file:
<plugin>
    <groupId>org.jacoco</groupId>
    <artifactId>jacoco-maven-plugin</artifactId>
    <version>0.8.4</version>
    <executions>
        <execution>
            <id>prepare-agent</id>
            <goals>
                <goal>prepare-agent</goal>
            </goals>
        </execution>
        <execution>
            <id>report</id>
            <goals>
                <goal>report</goal>
            </goals>
        </execution>
    </executions>
</plugin>
This plugin collects coverage data and generates a report in target/site/jacoco/index.html.
<goal>prepare-agent</goal>: Initializes the JaCoCo agent to monitor test execution.<goal>report</goal>: Generates a coverage report after the tests run.
Step 5: Link JaCoCo with SonarQube
To connect JaCoCo with SonarQube, update your sonar-project.properties file with these lines:
sonar.coverage.jacoco.xmlReportPaths=target/site/jacoco/jacoco.xml
sonar.junit.reportPaths=target/surefire-reports
These settings tell SonarQube where to find the coverage and test reports.
Step 6: Set Up a Quality Gate
A Quality Gate ensures that your project meets certain quality standards before being accepted. To create one:
- Log into SonarQube.
- Go to Quality Gates under Administration.
- Click Create and set rules like minimum code coverage percentage.
- Assign the Quality Gate to your project.
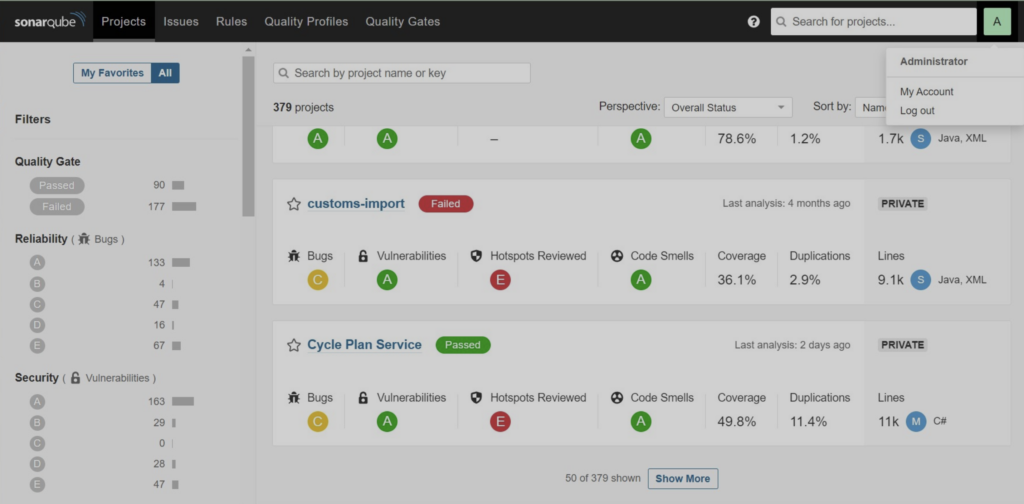
Below is a screenshot of the SonarQube administrator interface showing the menu structure:

Example Quality Gate Configuration
In SonarQube, you can define a threshold such as requiring at least 80% code coverage for a project to pass the Quality Gate. This ensures that a significant portion of the code is tested before release. The 80% benchmark is widely used in the industry as a good balance between test effort and code quality. However, for safety-critical applications (e.g., healthcare or automotive software), a higher threshold like 90% or more might be necessary. Conversely, for rapidly evolving projects, a lower threshold may be acceptable if paired with strong manual testing and code reviews.
Step 7: Troubleshooting Common Issues
Even with a proper setup, you might run into issues. Here are some common problems and solutions:
1. SonarQube does not display code coverage results
Ensure that JaCoCo is generating the jacoco.xml report and that the sonar.coverage.jacoco.xmlReportPaths property is correctly set. Also, verify that the report is in the expected location.
2. JaCoCo report is empty
Check that your tests are running correctly and that JaCoCo is attached as an agent during execution. Ensure the prepare-agent goal is included in the Maven configuration.
3. Quality Gate fails unexpectedly
Review the Quality Gate conditions in SonarQube. If code coverage is slightly below the threshold, consider adjusting test coverage or modifying the threshold based on project needs.
Frequently Asked Questions (FAQ)
How do I install SonarQube?
Download the latest version from the official website and follow the installation guide. SonarQube runs as a server and provides a web dashboard for code quality monitoring.
What is the recommended code coverage threshold?
Most projects aim for at least 80%, but critical applications like healthcare or finance may require 90% or more. Rapidly evolving projects may use lower thresholds if supported by other quality measures.
Why is my SonarQube scan not detecting JaCoCo coverage?
Ensure JaCoCo is generating an XML report and that the file path is correctly specified in sonar-project.properties. Also, confirm that SonarScanner runs after tests are executed.
Can I customize Quality Gates in SonarQube?
Yes, SonarQube allows you to define custom rules for Quality Gates, including thresholds for coverage, bugs, and vulnerabilities.
How often should I run SonarQube analysis?
Ideally, it should be part of your CI/CD pipeline, running with every code push to catch quality issues early.
Final Thoughts
Setting up a code coverage build gate in SonarQube helps maintain high code quality by ensuring sufficient test coverage. By following these steps, you can integrate SonarQube, SonarScanner, and JaCoCo into your Java project to track and improve test coverage.
For more information on best practices, you can refer to industry guidelines such as the OWASP Testing Guide, which provides additional insights into software testing methodologies.

